Y-axis motor replacement
Tools Required
M2, M2.5 hexagonal spanner; tie wraps; steel rule; brand new Y-axis motor

Note: Please complete the following operations in the power-off state, and keep the removed screws properly to avoid losing them
Disassemble the Y-axis motor
1. Unscrew the screws marked in the figure and remove the dust cover.
2.Disconnect the power cable from the Y-axis motor, and cut the cable ties marked in the figure below.
3.Loosen the screws on the coupling, but do not need to remove them.
4.Disconnect the coupling from the Y-axis motor .
5.Unscrew the screws marked in the picture to remove the Y-axis motor.
 Mounting Y-axis motor
1. Secure the new motor to the motor base, but without locking.
2. Check that the motor is aligned front to back with the drive shaft. If it is not aligned, loosen the screws marked in the diagram and adjust the position of the motor so that it is aligned front to back with the drive shaft. 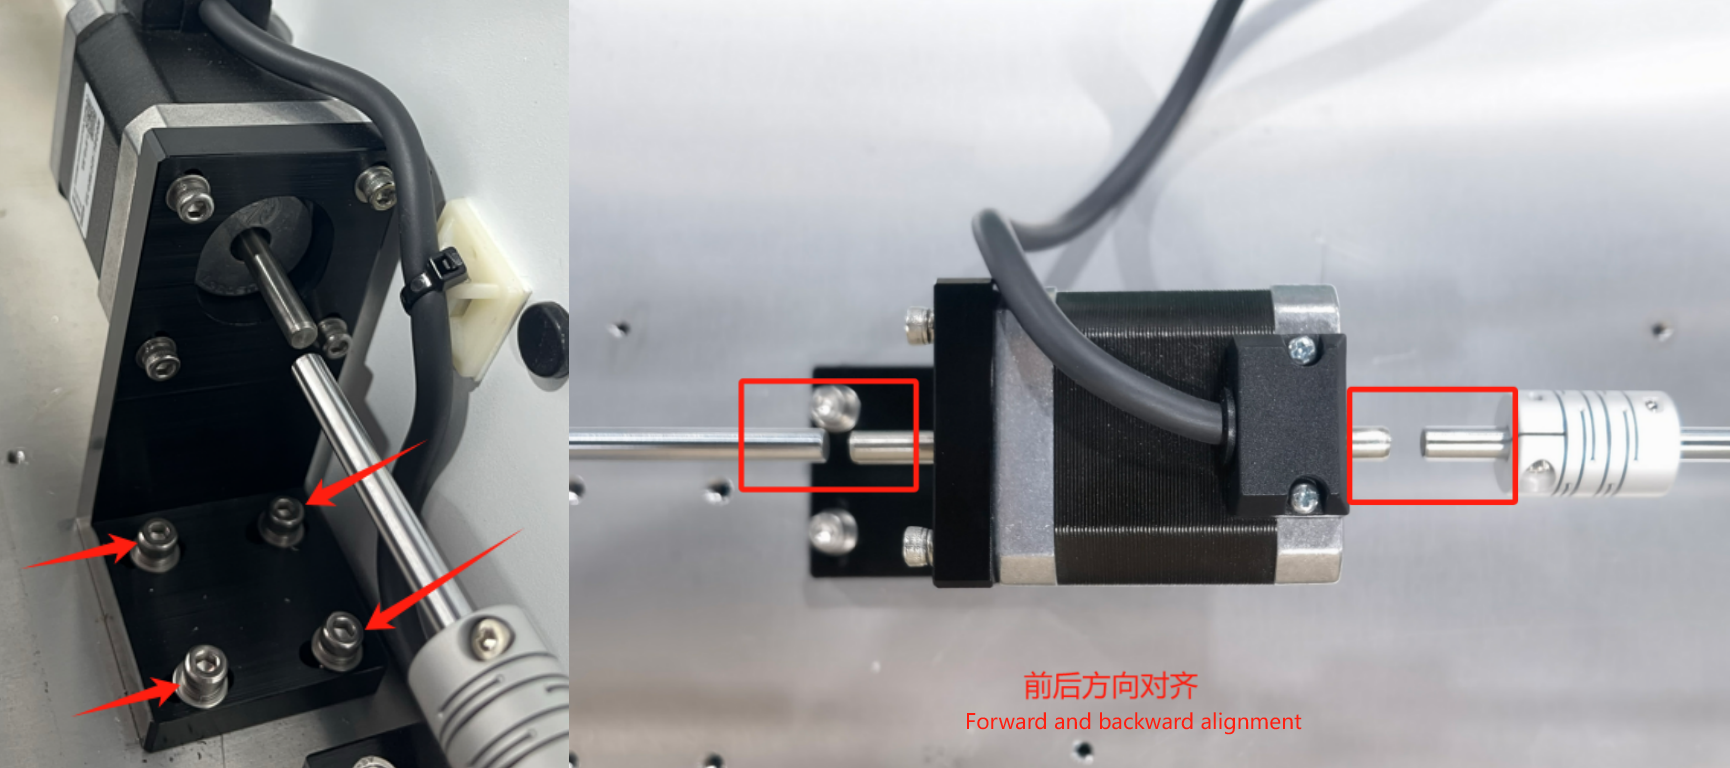 3.Check again to see if the motor is aligned with the top and bottom of the drive shaft. If it is not aligned, loosen the screws marked in the diagram and adjust the position of the motor so that it is aligned with the top and bottom of the drive shaft.
5. Lock the 3 screws on the coupling first, as shown in the picture.
Note: The screws of the 2 couplings need to be facing the same direction.
6. Adjust the orientation of the last screw on the coupling by moving the X-axis so that it is in a position for easy locking. Then use a steel ruler to measure the distance from each side of the X-axis to the end of the Y-axis on the same side, making sure the distance is equal on both sides. As shown in the diagram:
7.After ensuring that the measurements are correct and the distance is the same on both sides, keep the X-axis still and lock the last screw on the coupling.
8. After locking, use the steel ruler to measure the distance from both X-axis to the end of Y-axis on the same side again, whether it is the same; if the distance is not the same, please re-adjust the two couplings.
9. Re-connect the power cable of the Y-axis motor, and use cable ties to regulate the alignment.
10.Reinstall the dust cover to complete the replacement.
10.Reinstall the dust cover to complete the replacement.
Related Articles
Y-axis motor replacement
Tools to be prepared M3 hexagonal wrench*1, new Y-axis motor*1 NOTE: Please complete the following operations under power failure and keep the removed screws properly to avoid loss. Removing the Y-axis motor 1. Open the rear door cover of the unit 2. ...X axis motor replacement
Tools to be prepared M3, M2.5 hexagonal wrench, 5MM plum wrench NOTE: Please complete the following operations under power failure and keep the removed screws properly to avoid loss. Disassembling the X-axis motor 1. Unscrew the two right side belt ...X-axis motor replacement
Tools Required M2, M2.5, M3 hexagonal wrenches; M7 open-end spanners; tie wraps; brand new X-axis motor Note: Please complete the following operations in the power-off state, and keep the removed screws properly to avoid losing them Disassembly of ...Adjustment of the X-axis
Tools required M2,3,4 hexagonal wrench*1, 5.5mm open-end wrench*1 Note: Please complete the following operations under power-off condition and keep the removed screws properly to avoid loss. Procedure 1. Adjust the belt (if the belt elasticity is the ...Camera Replacement
Tools Required 1.5mm and 2mm Allen wrench, new camera module Remove camera ①. Open the front door cover and loosen the fixing screws on both sides of the camera cover, but there is no need to remove the screws. ②. Remove the camera cover. ③. Unplug ...