Equipment Maintenance Tutorial
Optical Component Maintenance
Tools Required
Lens cleaning solution、Cotton swabs、Door cover key、Mirror disassembly tool
If the provided cleaning solution runs out, it is recommended to use anhydrous ethanol to clean the lenses. To avoid damaging the mirror coating, do not use isopropyl alcohol.
If the provided cotton swabs are used up, you can use soft lint-free cloth or high-quality cotton swabs.
Maintenance Method
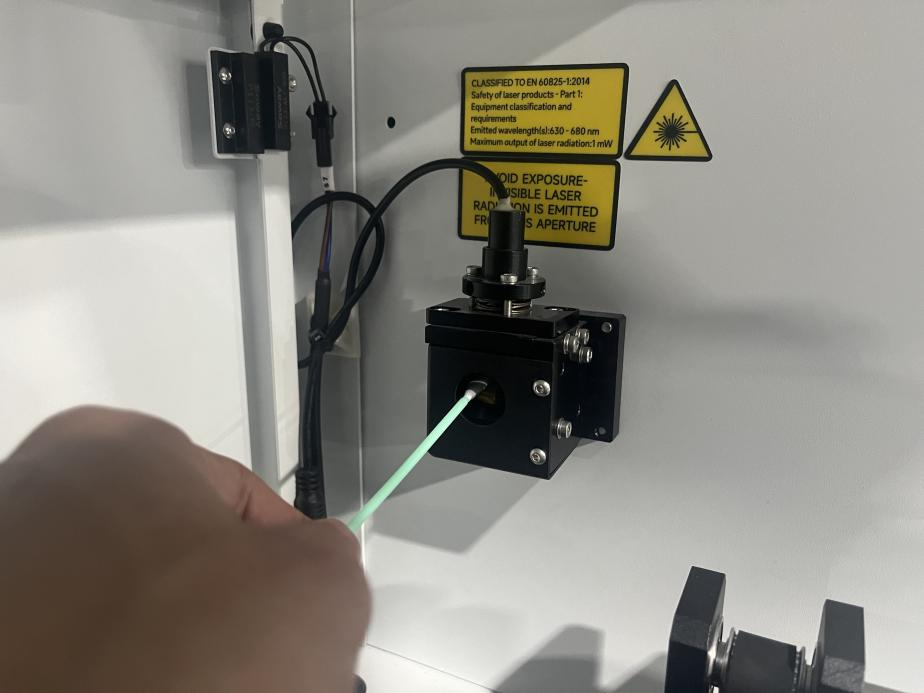
l Wipe the mirror clean with a cotton swab soaked in lens cleaning solution.
l Then use a dry cotton swab to remove any residual liquid from the mirror surface.
l Please perform maintenance on the following mirrors:
①.RF tube reflection mirror 1
Located on the lower left side of the device. (If it is a single-source configuration, please ignore this step.)
②.Glass tube reflection mirror 1 & dual-source lifting reflection mirror
Located inside the upper rear door of the device.(If it is a single-source configuration, there is no need to maintain the dual-source lifting reflection mirror.)
③.Beam combiner 
④. reflection mirrors 2 and 3
⑤.Focusing mirror
A. Hold the quick connector and then pull out the air pipe. Rotate the golden nut counterclockwise to remove the laser head module.
B. Rotate to separate the mirror tube from the laser head. The focusing mirror is installed inside the mirror tube.
C. Use the mirror disassembly tool to remove the focusing mirror and then perform maintenance.
D. Note: The focusing mirror should be installed with the convex side up, as shown in the figure.
Hardware Maintenance
Tools Required
Air gun、Lubricating oil、Rag、
①.Blow nozzle
Rotate counterclockwise to remove the blow nozzle and wipe off the dirt on the nozzle.
②.Auto-focus sensor
A. Use an air gun to blow away foreign objects from the sensor.
B. Wipe off the dirt on the sensor with a dry cloth.
③.RF tube maintenance & exhaust fan maintenance (Ignore this step for single-source machines)
A. Open the left lower side door cover of the device and use an air gun to blow away the dust from the RF tube cooling fan.
B. Similarly, use an air gun to blow away the dust from the exhaust fan.
④Chiller maintenance
A. Remove the outlet water pipe from the device and wait for all the water in the glass tube to flow back into the chiller.
B. You can unplug the chiller's inlet and outlet water pipes, power cord, and water protection line, and then move the chiller to a drain.
C. Open the drainage port at the bottom of the chiller and completely drain the water inside.
D. Refill with pure water up to the green water level line.
⑤.Waste hopper cleaning
Open the lower front door of the device, remove the waste hopper, and clean the debris stored inside.
⑥.Guide rail maintenance
A. Use an air gun to blow away foreign objects attached to the X/Y-axis guide rails and Z-axis lead screw, and then wipe off the dirt on the guide rails with a towel.
B. Use a cotton swab soaked in lubricating oil to apply an appropriate amount of lubricating oil to the X/Y-axis guide rail rollers and the top of the Z-axis lead screw. Move the X/Y/Z-axis back and forth to evenly distribute the lubricating oil.
Note: Please use an appropriate amount of lubricating oil, as excessive application can easily attract dust and dirt.
Maintenance Schedule
Please adjust the cleaning frequency of each component according to the actual usage. The frequency recommended in this document is for reference only.
每天 | 每周 | 3个月 | 6个月 | 12个月 |
Focusing mirror
| reflection mirrors 2 and 3
| Glass tube 1 reflection mirror RF tube 1 reflection mirror dual-source lifting reflection mirror
| Belts | Interior Work Space
|
Auto-focus sensor
| Work Table
| Chiller | Bearing and Rails |
|
| Cooling Fan | Vent Slots(back side of the machine) | Interior Work Space |
|
| Beam Combiner
|
|
|
|
Related Articles
Maintenance Guide
Optical Maintenance Tool Requirements Lens cleaner、Q-tip、hex key If the provided cleaning cleaner runs out, we recommend using absolute ethanol to clean the lens. To avoid damaging the lens coating, please do not use isopropyl alcohol. If the ...Dual-Source Installation Tutorial
Dual-Source Installation Tutorial Preparation Work Hex wrench Door cover key Crosshead screwdriver Installation screws Upgraded accessories related to the dual-source installation Mechanical Installation 1.Installation of the RF Tube ①.Use M4*12 ...One Laser Firmware Upgrade Tutorial
NotNote: Please contact the manufacturer's technicians to obtain the latest version of the firmware program. Before updating the control motherboard, the HMI firmware (i.e. panel firmware) must be updated first. During the firmware update process, ...One Laser Hydra Switching Dual Light Source Tutorial
Note: When configuring dual light sources in the software, make sure that the two lasers are of different types. If the two lasers are of the same type, the motherboard may mistakenly identify them as dual-tube mode, causing both lasers to start ...One Laser Firmware Upgrade Tutorial Hydra Series
NOTE: Contact the manufacturer's technician for the latest version of the firmware programme.The HMI firmware (i.e. panel firmware) must be updated before updating the control motherboard. During the firmware update process, please ensure that the ...